पत्ती
Mosaic Art Foundations: A Step-by-Step Guide for Beginners
Mosaic art is a classic creative practice that involves arranging small pieces of colored glass, stone, or other materials to form a larger image. While it may seem daunting to those who have never tried it, this traditional craft is surprisingly accessible for beginners and older children. It is an excellent activity for developing patience and planning skills, resulting in beautiful, shimmering artworks that can be kept for years.
Evan Charles Remington
लेखक
झलक
नीचे पूरा पाठ फ़्लोट करता है।
शेल्फ़
स्टोरी लीफ़
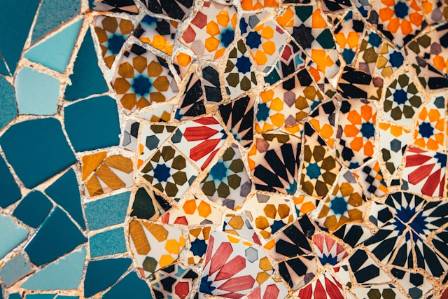
Mosaic art is a classic creative practice that involves arranging small pieces of colored glass, stone, or other materials to form a larger image. While it may seem daunting to those who have never tried it, this traditional craft is surprisingly accessible for beginners and older children. It is an excellent activity for developing patience and planning skills, resulting in beautiful, shimmering artworks that can be kept for years.
Getting Started: Recommended Age and Skills
Mosaic creation is an intricate process that requires a significant amount of focus. For children, this craft is most suitable for those aged eight and above. Younger children may find the precision required for gluing small tiles or the long drying times challenging; for them, foam mosaics or pattern blocks are often a better starting point. For adults, however, mosaics offer a relaxing and deeply rewarding way to experiment with color and pattern. You don't need professional training to begin—just the right supplies and a bit of creativity.
Essential Materials for Your First Project
Before you begin, gather the necessary tools and materials. Having a diverse selection of items will allow for more interesting textures in your final piece.
-
Tesserae (Tiles): Standard glass block tiles, mini glitter mosaics, or irregular mosaic stones are perfect. You can also incorporate found objects like colorful buttons or painted bottle caps.
-
Baseboard: A sturdy foundation is required. While you can mosaic onto vases or frames, a wooden project board (such as A5 size) is ideal for beginners.
-
Adhesive: Specialty tile glue works best, but non-toxic tacky craft glue is a safer and effective alternative for projects involving children.
-
Grout: This fills the gaps between tiles. Ensure you use a kid-safe grout or handle the grouting yourself, as traditional grout dust should not be inhaled.
-
Preparation Sealant: A mixture of equal parts PVA glue and water acts as a primer for wooden surfaces.
-
Application Tools: Use craft sticks for spreading grout and a damp sponge or cloth for cleaning the tile surfaces.

The Preparation and Design Process
The first step in any successful mosaic is the layout. It is highly recommended to plan your design before applying any permanent adhesive. You can do this by tracing the shape of your baseboard onto a piece of paper and arranging your tiles within those boundaries. This allows you to experiment with patterns and color combinations without the pressure of drying glue.
Once the design is ready, prepare your wooden baseboard by applying a coat of the homemade sealant. This step is crucial because it seals the wood, preventing it from absorbing moisture and ensuring a much stronger bond between the glue and the surface. Allow the sealant to dry completely before moving on to the assembly.
Assembly and Grouting Techniques
When you are ready to assemble your piece, apply glue to the back of each individual tile and press it onto the board according to your pre-planned design. Alternatively, you can spread a layer of glue across the board and set the tiles into it. Once the entire design is placed, the artwork must sit for at least 24 hours. This ensures the glue is fully cured before you introduce the moisture from the grout.
Grouting is the final transformative step that unifies the fragments into a single piece of art. Mix the grout following the package instructions until it reaches a spreadable consistency. Cover the entire surface, ensuring the mixture is pressed deep into every crevice between the tiles. While the grout is still wet, immediately wipe away the excess from the tops of the tiles using a damp sponge.
To achieve a professional shine, you will likely need to polish each tile multiple times with a clean, dry cloth once the grout begins to set. If your design includes deep objects like bottle caps, consider filling them with a temporary material like play dough beforehand to prevent grout from getting trapped where it isn't wanted. After a final 24-hour drying period, your mosaic will be complete and ready for display.

पास की पत्तियाँ

All About Oak Trees
Akira Lennox

सर्फर्स के लिए लहरों का मज़ा लेने की 11 सबसे अच्छी जगहें
कविता

रोबोट के प्रकार
एरिको गुइज़ो
समुद्र से जुड़े क्रिस्टल
नवीन

A Dive into the World's Most Spectacular Coral Reefs
Penny

Foundational Fashion: A Beginner’s Guide to Developing Personal Style
Callum Prescott